Tuesday 26 June 2012

Happiness in Crochet - little flower tutorial

I absolutely love these little flowers, they are fairly simple, but they are fiddly and need good light. The pattern and instructions can be found here, but that link will then send you on to a Japanese website and it takes some searching to find it there. I would have linked it directly, but it does occasionally go offline (like today), so I thought I share this little photo tutorial :-)

It doesn't require a lot of yarn, but I think these work better with a clear cut yarn rather then a fuzzy wooly one (sorry for the lack of technical terms there).

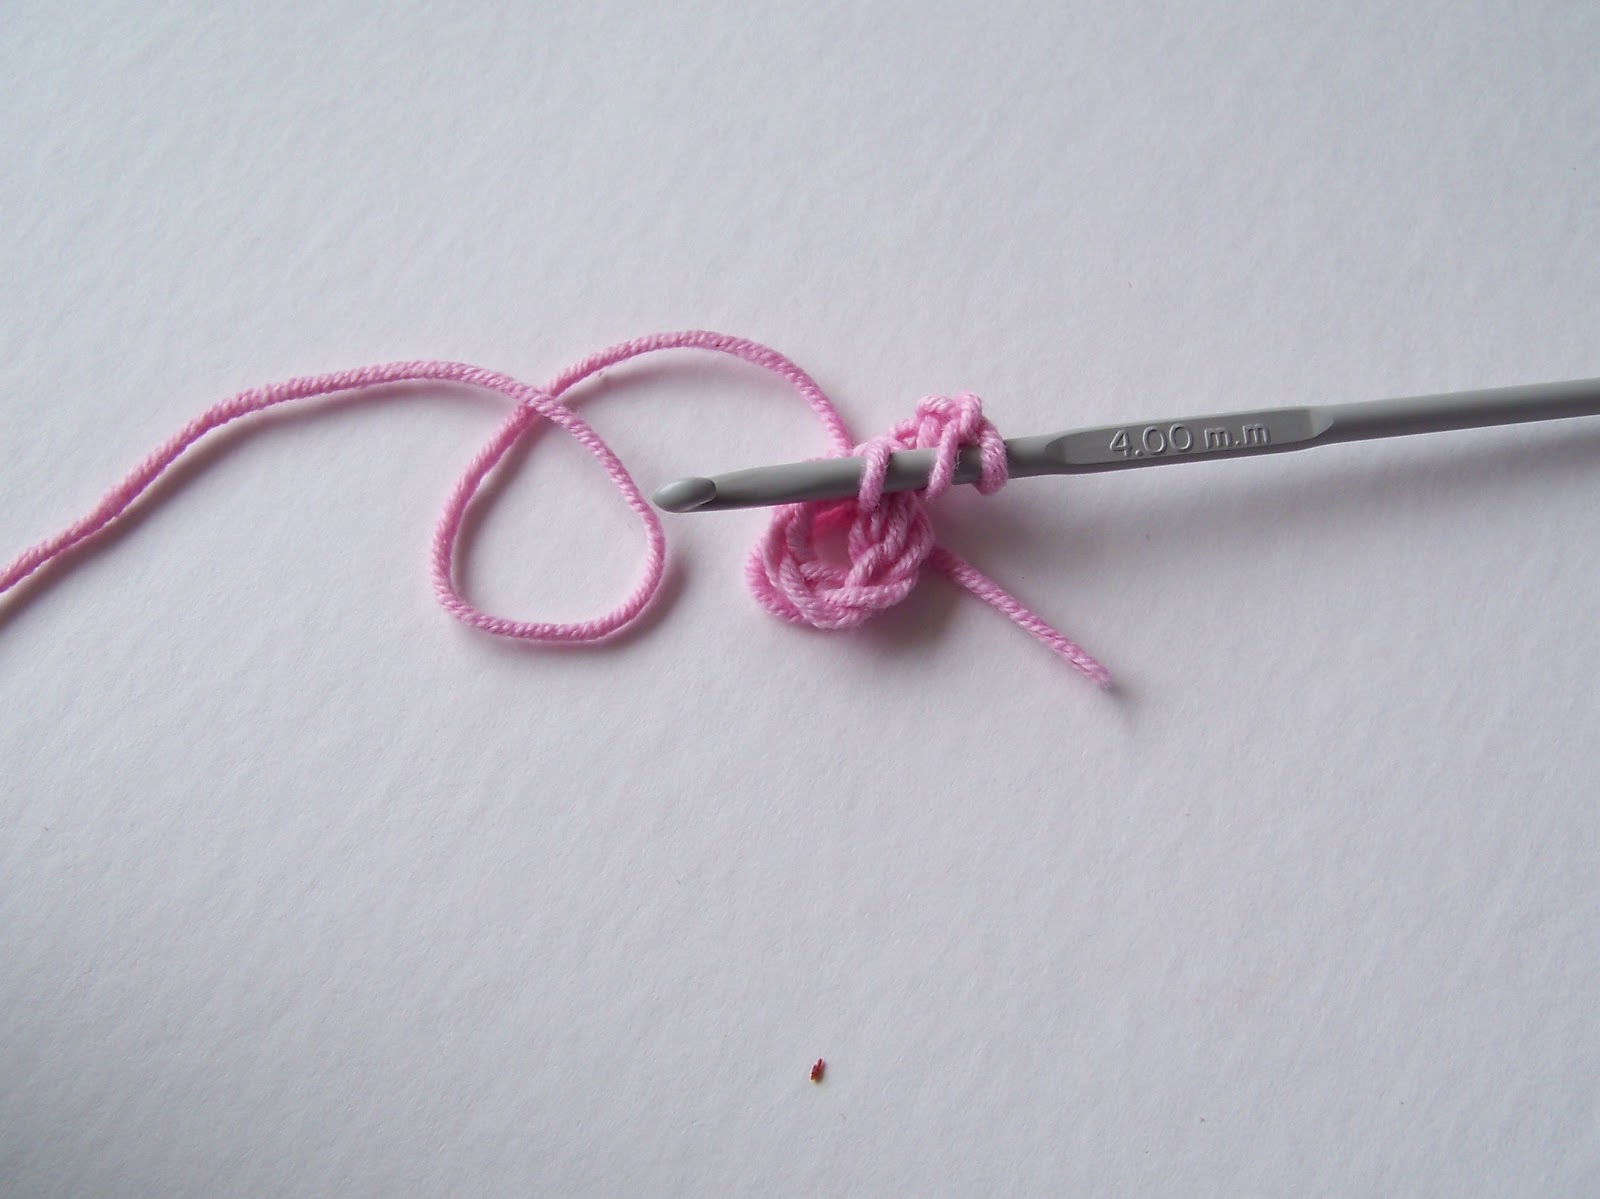
1, make a slip knot leaving about 8-10 cm of 'tail'


2, chain 5

3, attach the last stitch to the first one with a slip stitch (pull the yarn through both stitches in one go), so it forms a nice little circle (with 5 chains - one for each petal of the flower)


4, chain 3


5, make a double crochet (in the UK that would be a trebble I believe) into the circle


6, chain 3


7, attach the chain with a slip stitch to the chain of the circle. You might need to wriggle the chain and the double crochet to the side a bit so the the chain stitch where the petal attached becomes visible - this is the afore mentioned fiddly bit. I found it helped if I used my left hand (thumb and pointer) to 'hold' the space whilst crochting the petal with my right hand. Sadly I couldn't photograph this bit, because I was out of hands :-)


8, this is one petal finished. You now repeat these steps another 4 times until you have 5 petals in total. Once you attached the last petal, you do another (one) chain stitch then cut the yarn leaving a tail of about 8-10 cm and pull it through the last chain. The first 'tail' should be right underneath the second tail so I usually double knotted them, because that tightened up the flower ring a little and made it prettier.

9, To attach a second flower:

you finish the first petal and start on the second one by chaining 3 and making one double crochet into the circle. Then you remove the needle and put it through the top of a double crochet of the flower you want to attach it to.


Next you simply pull the loop through.


Then you chain 3 and attach the chain to the circle. After that you continue with the rest of the petals. As my scarf had 2 rows I also attached a flower to the 3rd petal.


Here are the two flowers finished with the tails knotted


To finish off: usually I just weave the yarn in with my crochet hook, but I thought it would look prettier if I use a yarn needle (they are the big ones that don't have a sharp point) and thus reinforce the circle as well. So, with one end I went around clockwise and with the other end I went around anti-clockwise.


I think it tightened it up rather nicely in the end.


 add a few more flowers in lots of different colours and you end up with a very cheerful scarf.


Happiness in Crochet :-)

Sunday 24 June 2012

lots of little flowers

I had originally planned to make a flower scarf for my little daughter using Japanese flowers, but I hadn't realised how big the flowers actually were. So, after a length searching on Ravelry (twice, because obviously I didn't bookmark it the first time and then couldn't find it again) I found a little flower scarf that was just adorable. Fifty little flowers later and a scarf emerged :-)


I have rarely felt as positive about a project as I do about this scarf. It is just so cheerful and bright.


In fact, it's positively gigglicious :-)


The pattern can be found here and later this week I'll post a photo tutorial, because they are just too beautiful and should be shared xxx


Baby, it's cold inside

no that is not a typo, I meant to say inside not outside. Outside it is a balmy 19 degrees (Celsius) and a light breeze. Inside it is a not so balmy 11 and my hands are shivering whilst typing (note to self: get some fingerless gloves).

The only heated room in the house is kid's bedroom, so not a lot of sewing has been happening since the sewing machine lives in the dining room and that is the coldest room in the house (currently measuring at 9 degrees Celsius).

Instead I have been knitting and crocheting in the kid's bedroom. One blue ruffle scarf to replace a rather ratty looking one a bought 5 years ago.


It looks a bit feather-boa-ish, but is snugly warm and it is the first time I have knitted with 'novelty' yarn. I have been knitting for years, but I have never been very adventurous so I essentially I just stuck to the garter stitch and that was it. Last year I made myself learn how to purl and surprisingly the world did not end and I quite enjoyed learning something new. I still prefer to crochet, but I do like to knit occasionally - variety is the spice of life and all that :-)

Friday 15 June 2012

more procrastination - a new book

procrastination thy name is Giggles ...

I find the hardest thing about sewing is actually cutting into the fabric, which is pretty silly considering I mostly sew with remnants that are 2 dollars a metre at Spotlight. Also, they are by no means rare specimens, but, with all the trepidations I go through before actually cutting into the piece, you wouldn't know it.

In case you are wondering what brought that on, I have a piece of oilcloth - a remnant - that is barely big enough for the sewing machine carrier outer layer and I have been debating how to cut it most effectively basically since last Friday. I keep worrying that I'll cut it just too small (by like a cm or so) and then it'll all be wasted. I have made excuses saying that the hardware (eyelets for the straps) have not arrived yet so I can take my time, but in reality I have just been procrastinating over a piece of fabric that cost me a $1.20.


It's nice, but still, there is no need for the long decision making process :-)

However today was a wonderful day anyway, because I won the book DIY Couture from the very talented Karen at Did You Make That and it arrived TODAY, yeay.


The Cape inside it and the Cape pattern in the Sew Everything book are yelling at me wanting to be sewn just in time for the winter here, but I am really trying to resist it. It wouldn't get a lot of wear and I don't have any heavy fabrics.  Let's see how good I am at that sort of impulse control :-)

Thursday 7 June 2012

sidetracked again - a sleep mask story

I love sleep masks, but now that I hardly every fly, I actually have to buy them and they actually cost around the 15 dollar mark. So for the last 2 years I kept telling myself to just make them myself (I can hand sew just fine), except I never really got there. Well, no time like the present and now that I had the scraps of the pyjama pants that were a lovely thick flannel so I had no excuse ...

So I cut it all out (double the black fabric to make sure it is actually dark enough) ...


... pinned the nose piece to the face piece and sewed it in place ...


... attached the elastic through all fabric pieces ...


 ... then used wide bias tape to finish it all off


the bias tape is not particularly neat (especially the bottom one), but I didn't want to redo it all again. Afterwards I thought you could probably if you have an overlocker/serger you could just do the edge with that and not bother with the dreaded bias tape.

Now Giggles, back to the sewing machine bag already :-)

Monday 4 June 2012

Pyjama Party

I realised a few weeks ago that my son has outgrown all of his pyjama pants (well, the tops as well, but I am not quite there yet sewing wise, so I'll just see whether I can pick up some matching cotton tops), SO ... after some shopping for green fabric at fabric.com and a weekend's worth of work - I know that other people can whip them up in couple of hours, but in my house it is all done in 15 min. intervals - anyway, we now have

not one,                                                                                            not two,


but three beautiful pyjama pants - why yes, he did insisted on wearing them for dinner :-)


There is room for improvement, mainly because they are 'roomy' (sorry, couldn't help myself there) on top - I used the shorts pattern I made, but cut the outside seam on the fold and didn't take out the seam allowance - and a bit long, but he wanted them longer so his feet won't go cold. Having said all that he does grow, so it's all good.

At first I thought I would follow Dana's pants tutorial again, but I had noticed that other people sewed the pants crotch seam with one pant leg inside the other one, so I thought I give that a go (in the name of  trying to learn new things etc) and it worked beautifully.

I was particularly proud of my inside seams being all neat and tidy with the overlocker foot and a zigzag stitch.


Onwards to the next project ... I am thinking of perhaps a carrier bag for my sewing machine for when I go and sew with friends ... OKAY, we mostly drink tea and chat, but some sewing is being done :-)

Friday 1 June 2012

last post about MMM

To finish the Me-Made-May with the difference I made myself (nothing earth-shattering I know) a cushion. It's cuddly and lovely, and stripey :-)


It made from the quilting cotton 'A Stitch in Color' by Moda. It is very vibrant and the collection has some really nice bold colour choices in it. It's designed by Malka Dubrawsky (Blog here ) and I really had to hold myself back and only buy enough for a pillow. A big 'thank you' to Lori of Girls in the Garden who found out the name of the collection for me.

It's the first time I attempted anything resembling patchwork and I am not sure I am suited for it. I don't think I am precise enough in the cutting and sewing process :-) The back illustrates it very well.


It was meant to be an envelope style, but I didn't have enough stripes cut for the back. Somehow the swirly fabric was shorter then the rest and the pillow I had was larger, so I inserted an invisible zipper instead. Of course the stripes then didn't match up, but I had to call off my inner perfectionist and tell myself 'It's a cushion, nobody will care about a mismatched stripe'

now it is definitely time for the pyjama pants :-)